The 10 Most Terrifying Things About Electric Fireplace Wall Hanging
Electric Fireplace Wall Hanging Ideas The wall-mount electric fireplaces are available to use straight out of their box. Electric fireplaces are ideal for adding ambiance to your home without the need to remodel or venting. They're usually heavy and require careful installation. Follow these steps to set up your new electric fireplace correctly. 1. Connect the Brackets 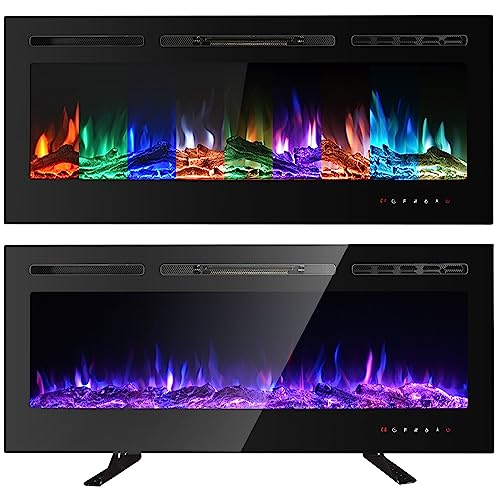 A wall-mounted or recessed electric fireplace instantly enhances the appearance of any room. It's the ideal solution for homes that don't have an existing fireplace opening, or for apartment living. First, decide where you'll install your new electric fire. It's important to find a location that won't be vulnerable to moisture and is at least just a few inches from drapes, furniture, and areas that are prone to traffic. Mark the wall with layout marks to mark the top and bottom plates for the fireplace frame. Make use of a drill or another tool to drill exploratory holes into the wall. Find studs using an stud-detector. Then, mark the wall with the position of the brackets for mounting your fireplace. Next, patch and paint the drywall, or make the wall a bit bigger to prepare it for the fireplace installation. Depending on the wall-mounted fire, you may either need to fit the firebox and screen as one unit or separate them by an adjustable wall bracket. If you're not sure of your abilities to manage this task on your own, consider hiring an experienced general contractor or carpenter. You can find a template included with most electric fireplaces. However, you should also keep a spirit level handy and a pencil to mark out the exact location where the wall brackets will be installed. Make use of the template to make sure that the power cable from the fireplace will connect to an outlet nearby to connect it. Once the studs and fireplace frame are in place, you can then install drywall that is as smooth and flush as possible to give a neat appearance. Add a trim piece to the bottom of the frame, and then paint and sand the entire frame to give it an attractive appearance. You'll need to put the hooks or slots on the back of the majority of electric fireplaces that are wall mounted into the mounting brackets. Make sure that the slots or hooks are properly aligned prior to you connect the fire to the wall brackets. Once the fire is set you can add additional elements like crystal embers, driftwood log pieces, or decorative rocks. 2. Check the Bottom Bracket The space above a fire mantel, chimney breast or mantel is the ideal spot to hang artwork. However, there's a line of distinction between an artistic arrangement & one that distracts from the overall look of the fireplace's design. A common rule is that a photograph should not exceed 80percent of the length of the mantel or fireplace it sits over. This will keep it proportionate and look great on the wall. Other decorative and ornamental items placed on the mantel could also influence this size & proportional guidelines. If you intend to display a photo above your electric fire, the frame should be made of glass or another material that can withstand high temperatures. If you're not sure whether the frame is suitable, you can test the frame using a heat-sensitive cloth to see whether it's suitable for this application. The possibility of destroying artwork through smoke and hot stray heat is a typical issue when displaying artwork over a fireplace. This is not an issue with gas or wood-powered fireplace. However should you decide to install an electric wall fire it is essential to follow the instructions provided by the manufacturer. Most electrical fires have an attached bracket that can be attached to the wall using hanging screws or a wall-mounted fixing system. If the latter option is used, it is recommended that you drill exploratory holes in an isolated area of the wall prior to when you attempt to mount your electric fire. After that you can use a pipe & cable finder to ensure that there aren't any pipes or cables in the vicinity of the location you've chosen to mount it. If so, you could put your fire in the electrical socket or move it to a different location. If you decide to move it to a new location, you'll need to ensure that the power cable can reach from the fire to the electrical socket – this is particularly important for older homes or homes with solid walls. If not, your electric fire won't perform as it should. Some models come with templates that show you the locations to drill holes, while others require you to use an apex level and pencil to mark the location on your wall. 3. Connect the Power Cord You may have to move your plug socket to the back of the fireplace if you've installed a recessed fireplace. super fast reply can create a more elegant appearance. Make sure to test the fireplace before you do this to ensure that everything is working exactly as it should. A third popular way to install an electric fireplace is to frame space and then build it into the wall. This will give you a traditional, finished look and allows for an optional mantel. The owner's manual for the particular model will provide information about framing, securing the fireplace, and wiring. Mark the location of your electric fireplace on the wall using either a pencil or marker. Make use of a carpenter's level ensure that the installation area is flat and level. You can also use a stud finder to mark the location of studs so that you can be certain that you're drilling into a safe spot. Once you've marked the installation location then use your electric drill to create holes for the hanging screws or bracket screws. Make sure to follow the precise directions in the owner's guideline for this step, particularly when you're installing the fireplace within a drywall. If you are unsure how to do it then you can ask an expert for assistance. A cable organizer kit can be used to hide power cords. These kits usually include sleeves, clips or boxes that can be used to bundle cables. You can also use fish tape or wire snake tools to help guide the cords along the wall. If you don't want to cut the drywall, a Powerbridge kit will provide a cleaner and more secure connection. Additionally, you can disguise the cords with paintable wire covers or by adhering them to the wall and skirting board. Make sure to keep the cover or tacks far from sources of heat. This will avoid accidental contact and protect the cord. 4. Connect the adapter A wall-mounted electric fireplace is a great option for home renovations or for those who don't have the space or the money to build a gas fireplace. They are easy to install and are ready to use right from the box. They are an excellent choice for those looking for a chic modern design or the warmth fireplaces provide. They are designed to be hung as art on any wall, they can be recessed or not at all recessed and come with a heating powered by fans. It's a good idea create an inventory of all the tools and equipment you'll require prior to beginning the installation process. You can find the complete instructions on how to install an electric fire in the user's manual. Some models might require you to screw the brackets directly to the wall, while others may feature a mounting plate that slides into slots or hooks that attach to the mounting brackets. It is crucial to eliminate any combustible materials from the area you are installing a fireplace that is recessed. In general the materials should be kept 3 feet away from the front of the fireplace and 1.5 feet from its sides. After you have inspected all the components, connect your electric fire and ensure that it works. This is an essential step, as it will ensure that the flame effect screen and heater work as intended. This will also give you an idea of how the finished product will look in its final location. Cover the cord when you are sure that it is working properly. This will keep the final product neat and neat. It is possible to achieve this by installing a new outlet with a cord that can be tucked behind the unit. super fast reply will give your fireplace a seamless appearance.